


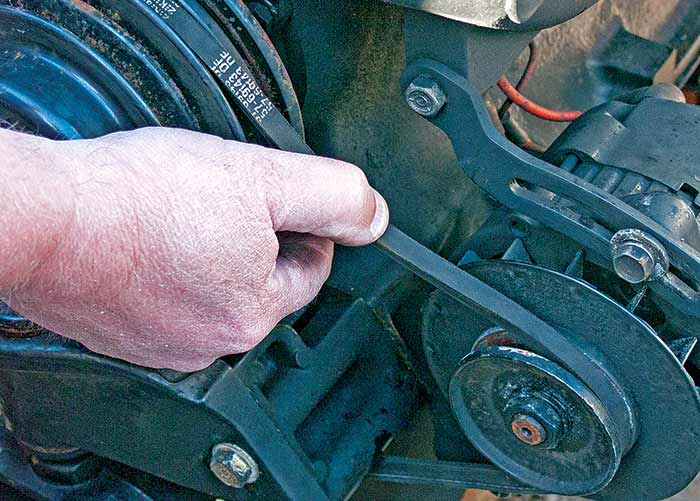
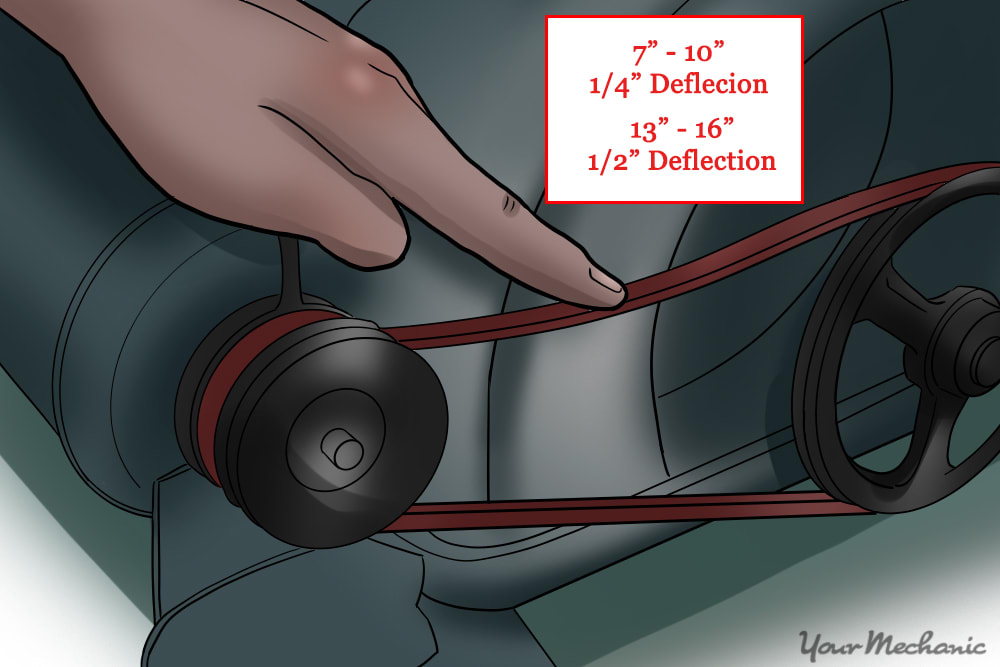
To check the alternator belt tension, press down on the belt midway between pulleys. It should deflect about half an inch.
The alternator belt is crucial for your vehicle’s electrical system, driving essential components like the alternator, power steering pump, and air conditioning compressor. Regularly checking its tension ensures optimal performance and prevents breakdowns. A loose belt can cause squealing noises and inefficient functioning, while an overly tight belt can strain the alternator and other connected components.
To maintain your vehicle’s health, conduct routine inspections and adjustments. Proper tension ensures the belt operates efficiently without unnecessary wear. This simple maintenance task can save you from costly repairs and extend the lifespan of your vehicle’s components. Regular checks are vital for a reliable and smooth-running engine.
Introduction To Alternator Belt Tension
Maintaining the correct tension in your alternator belt is crucial. It ensures the smooth operation of your vehicle’s electrical systems. A properly tensioned belt drives the alternator efficiently, which charges the battery and powers electrical components.
Significance In Vehicle Performance
The alternator belt plays a key role in vehicle performance. It directly affects the alternator’s ability to generate power. If the belt is too loose, it slips and reduces the alternator’s efficiency. This can lead to a drained battery and poor electrical performance.
Conversely, a belt that is too tight puts extra strain on the alternator’s bearings. This can cause premature wear and tear, leading to costly repairs. Ensuring the correct tension helps maintain optimal vehicle performance and longevity.
Symptoms Of Incorrect Tension
Recognizing symptoms of incorrect belt tension is essential. Here are some common signs:
- Squealing noises: A loose belt often produces a squealing sound.
- Dim headlights: Insufficient power generation can cause dim lighting.
- Battery warning light: A loose or tight belt may trigger this warning.
- Frequent battery issues: Constantly dealing with a dead battery can be a sign.
- Excessive belt wear: Check for cracks or fraying on the belt surface.

Credit: www.wikihow.com
Anatomy Of The Alternator Belt
The alternator belt is a crucial part of your car’s engine. It connects the alternator to the crankshaft. This belt ensures your car battery stays charged. It also powers other systems like air conditioning and power steering. Understanding its anatomy helps in maintaining your car better.
Material And Design
The alternator belt is made from durable materials. Rubber and synthetic polymers are common. These materials withstand high heat and friction. The belt has a ribbed design. The ribs improve grip and reduce slippage. This design ensures efficient power transmission.
| Material | Properties |
|---|---|
| Rubber | Flexible and heat-resistant |
| Synthetic Polymers | Durable and long-lasting |
Role In Engine Operation
The alternator belt plays a vital role. It transfers power from the crankshaft to the alternator. This keeps the battery charged. The belt also powers other accessories. These include the water pump, air conditioning, and power steering. A faulty belt can lead to engine failure.
- Keeps the battery charged
- Powers air conditioning
- Powers power steering
- Operates the water pump
Regular checks on the alternator belt ensure smooth engine operation. Look for signs of wear and tear. Replace the belt if necessary to avoid breakdowns.
The Consequences Of Neglect
Neglecting to check your alternator belt tension can lead to severe problems. This seemingly small task ensures your car’s health and longevity. Here are the key issues that arise from ignoring this crucial maintenance step.
Reduced Battery Life
An improperly tensioned alternator belt can cause your car’s battery to drain faster. The alternator recharges the battery while the engine runs. If the belt is loose, the alternator can’t generate enough power. This makes the battery work harder and reduces its lifespan.
Signs of a loose belt affecting the battery include:
- Dim headlights
- Slow engine crank
- Frequent battery replacements
Keeping the belt tension in check ensures your battery lasts longer and performs better.
Potential Engine Damage
A loose alternator belt affects more than just the battery. It can cause significant engine damage. If the belt slips or breaks, vital engine components can stop functioning. This includes the water pump, which prevents the engine from overheating.
Consequences of a failed water pump include:
- Overheating engine
- Warped engine parts
- Expensive repair costs
Ensuring proper belt tension helps avoid these costly and damaging issues. Regular checks can save you from unexpected engine failure.
Maintaining the correct tension on your alternator belt is a simple but crucial task. It safeguards your vehicle’s battery life and engine health.
Pre-inspection Preparations
Before checking the alternator belt tension, some preparations are essential. These steps ensure a smooth and safe inspection. Proper preparation helps avoid mistakes and keeps you safe.
Safety First: Tools And Precautions
Safety is the top priority during any car maintenance task. Gather the necessary tools and follow safety precautions:
- Tools Needed:
- Socket wrench set
- Belt tension gauge
- Flashlight
- Safety gloves
- Screwdrivers
- Safety Precautions:
- Ensure the car is on a flat surface
- Turn off the engine
- Disconnect the battery
- Wear safety gloves
- Use a flashlight to see better
Following these steps ensures a safe and efficient inspection.
Identifying The Alternator Belt
Locating the alternator belt is the next step. The alternator belt is usually at the front of the engine. It is connected to various pulleys. Here’s how to identify it:
- Open the car hood
- Look for a black rubber belt
- Find the belt connected to the alternator
- Check for other pulleys it connects to
- Use a flashlight to see clearly
Identifying the belt correctly is crucial for an accurate tension check. Ensure you have a clear view and understand the belt’s path.

Step-by-step Tension Checking
Checking the tension of your alternator belt is crucial. It ensures your vehicle runs smoothly. Proper tension prevents slippage and wear. Follow these easy steps for a thorough check.
Manual Tension Testing
Manual tension testing is simple and requires no special tools. Here’s how you can do it:
- Turn off the engine and let it cool.
- Locate the alternator belt in the engine bay.
- Press down on the belt with your thumb.
- Check for 1/2 inch to 1 inch of deflection.
- Inspect for any cracks or wear on the belt.
If the belt moves more than 1 inch, it is too loose. Adjust the tension accordingly.
Using A Belt Tension Gauge
A belt tension gauge provides accurate readings. Follow these steps to use one:
- Turn off the engine and let it cool.
- Locate the alternator belt in the engine bay.
- Place the gauge in the center of the belt span.
- Press the gauge until it clicks or shows a reading.
- Compare the reading to your vehicle’s manual specifications.
Adjust the tension if the reading is outside the recommended range.
| Method | Steps | Tools Needed |
|---|---|---|
| Manual Testing |
|
None |
| Belt Tension Gauge |
|
Belt tension gauge |
Interpreting Tension Readings
Understanding alternator belt tension readings is crucial for vehicle health. The right tension ensures the alternator works well. This section will guide you through interpreting these readings.
Ideal Tension Range
Every vehicle has a recommended tension range for the alternator belt. This range ensures the belt is neither too tight nor too loose. A common range is between 100 to 200 pounds of force.
Too much tension can wear out the belt and bearings. Too little tension can cause the belt to slip and fail. Always refer to your vehicle’s manual for the exact range.
Adjusting The Tension
Checking the tension is the first step. If the belt is too loose or tight, adjustments are needed. Here’s how to adjust the belt tension:
- Locate the adjustment bolt on the alternator.
- Use a wrench to loosen the bolt.
- Move the alternator to the desired tension.
- Retighten the adjustment bolt.
Recheck the tension after making adjustments. It ensures the belt is within the ideal range. Regular checks and adjustments keep your vehicle running smoothly.
Tension Adjustment Techniques
Ensuring the correct tension of your alternator belt is crucial. A loose belt can cause improper charging. A tight belt can damage components. This section covers the essential techniques for adjusting belt tension.
Loosening The Alternator Mount
To adjust the alternator belt tension, begin by loosening the alternator mount. Follow these steps:
- Locate the alternator on your engine.
- Identify the mounting bolts that secure it.
- Use a wrench to loosen these bolts.
- Allow the alternator to move freely.
Tip: Ensure the engine is off before starting. This keeps you safe.
Setting The Correct Tension
With the alternator mount loosened, you can now set the correct tension:
- Push the alternator to create tension on the belt.
- Check the belt deflection using a tension gauge.
- Ensure the deflection is between 1/2 inch and 1 inch.
- Tighten the mounting bolts back in place.
Note: Use a ruler if you don’t have a tension gauge. Measure the belt deflection by pressing down on it midway between the pulleys.
Proper tension ensures efficient performance and longevity of your alternator belt. Regular checks can prevent unexpected breakdowns.
Post-adjustment Checks
After adjusting the alternator belt tension, it’s vital to perform post-adjustment checks. These checks ensure the belt functions properly and lasts longer. Below are key steps to follow:
Re-testing Tension
Start by re-testing the alternator belt tension. Use a belt tension gauge for accuracy. The belt should have some give, but not too much. A properly tensioned belt will flex about half an inch when pressed.
If the belt is too tight, it can cause bearing wear. If it’s too loose, it may slip or squeal. Ensure the tension is just right to avoid these issues.
Ensuring Proper Alignment
Next, check the belt alignment. Misalignment can lead to uneven wear and tear. Use a straight edge tool to ensure the belt lines up perfectly with the pulleys.
Proper alignment prevents the belt from jumping off the pulleys. It also ensures smooth operation of the alternator and other connected components.
| Step | Action |
|---|---|
| 1 | Re-test belt tension using a tension gauge. |
| 2 | Check belt flex; it should move about half an inch. |
| 3 | Ensure belt alignment with a straight edge tool. |
- Proper tension avoids slippage and noise.
- Correct alignment prevents uneven wear.
- Both steps extend the belt’s lifespan.
Remember, these checks are crucial for a reliable vehicle. Perform them regularly for peace of mind.
Maintenance Tips For Longevity
Maintaining your alternator belt is crucial for your car’s health. A well-maintained belt ensures smooth engine performance. Follow these tips to extend its life.
Regular Inspection Intervals
Inspect the alternator belt every six months. Check for cracks, wear, and tension. Use a tension gauge to measure. Refer to your car manual for the correct tension.
| Inspection Interval | What to Check |
|---|---|
| Every 6 months | Cracks, wear, and tension |
| Every oil change | Belt alignment and condition |
Preventive Measures
Preventive care can save time and money. Keep the belt clean. Use a belt dressing spray to reduce wear. Avoid overloading the alternator with too many accessories.
- Keep the belt free of oil and dirt.
- Use belt dressing spray.
- Avoid overloading the alternator.
Follow these simple steps to ensure your alternator belt lasts long. Regular checks and preventive care are key to a healthy engine.

Credit: www.boatus.com
Troubleshooting Common Issues
Regularly checking your alternator belt tension is crucial for vehicle health. Understanding common issues helps you troubleshoot effectively and prolong belt life. Below are some common problems and how to identify them.
Squealing Noises
A squealing noise often indicates a loose or worn-out alternator belt. This noise typically occurs during startup or acceleration.
Use these steps to identify the problem:
- Turn on the engine and listen for the squeal.
- Inspect the belt for visible wear or cracks.
- Check the tension by pressing down on the belt.
If the belt moves more than half an inch, it needs adjustment.
Slippage And Fraying
Slippage and fraying can lead to poor engine performance. This happens when the belt loses grip or starts to deteriorate.
| Signs of Slippage | Signs of Fraying |
|---|---|
| Engine warning lights | Visible tears on the belt |
| Reduced battery charge | Edges appear worn |
| Poor alternator performance | Loose threads |
To fix these issues, follow these steps:
- Turn off the engine and let it cool.
- Inspect the belt for any damage.
- Replace the belt if necessary.
A well-maintained belt ensures the engine runs smoothly.
When To Seek Professional Help
Checking the tension of your alternator belt is important. It ensures your car runs smoothly. Sometimes, this task may require professional help. Knowing when to call a mechanic can save you from bigger problems.
Complex Adjustments
Some cars have complicated belt systems. These systems need specialized tools and skills. If your car’s belt system looks complex, seek a mechanic.
A mechanic knows how to handle intricate belt setups. They will adjust the tension correctly. This prevents over-tightening or under-tightening.
Incorrect tension can lead to belt wear. It can also cause damage to other engine parts. A professional will ensure your belt is in good shape.
Replacing The Alternator Belt
Sometimes, the alternator belt needs replacing. This is beyond a simple tension check. Replacing the belt involves several steps. A mechanic can do this quickly and safely.
Here is a simple table to help you understand the process:
| Step | Description |
|---|---|
| 1 | Remove the old belt |
| 2 | Inspect pulleys and tensioners |
| 3 | Install the new belt |
| 4 | Adjust the new belt’s tension |
These steps require precision. A mechanic has the experience to do it right. This ensures your car runs without issues.
In summary, seek professional help for complex adjustments. Also, call a mechanic if the belt needs replacing.
Enhancing Vehicle Reliability
Regularly checking your alternator belt tension can greatly enhance vehicle reliability. The alternator belt powers essential components like the alternator, water pump, and power steering pump. Proper tension ensures these components run smoothly, preventing unexpected breakdowns. A well-maintained belt helps your vehicle last longer and reduces repair costs.
The Role Of Professional Servicing
Professional servicing plays a crucial role in maintaining your alternator belt. Technicians have the tools and expertise to check and adjust belt tension accurately. They can spot wear and tear that might not be visible to untrained eyes.
Professional checks also ensure that the belt is not too tight or too loose. Both conditions can cause engine problems. Excessive tension can strain the belt and pulleys. Loose belts can slip or break, leading to a loss of power to crucial components.
| Service | Benefits |
|---|---|
| Professional Belt Inspection | Accurate tension adjustments, early wear detection |
| Belt Replacement | Prevents sudden breakdowns |
Final Thoughts On Belt Tension
Maintaining proper belt tension is essential for vehicle reliability. Regular checks can prevent costly repairs and ensure smooth operation. Always consult a professional for accurate belt tension adjustments.
Follow these steps for a quick DIY check:
- Turn off the engine and allow it to cool.
- Locate the alternator belt in your engine bay.
- Press down on the belt with moderate force.
- Check for any cracks, fraying, or signs of wear.
- If the belt moves more than half an inch, it may need adjustment.
Keep your vehicle running smoothly by ensuring your alternator belt is in good condition. Regular maintenance checks are key to long-term vehicle health.

Credit: www.yourmechanic.com
Frequently Asked Questions
How Do You Check Alternator Belt Tension?
Check by pressing the belt midway between pulleys. It should deflect about half an inch.
What Are Signs Of Loose Alternator Belt?
A loose belt may cause squealing noises, poor battery charging, and dimming lights.
How Often Should You Check Belt Tension?
Inspect the alternator belt tension every 10,000 miles or during regular maintenance.
Can A Loose Belt Cause Engine Damage?
Yes, a loose belt can lead to overheating and other serious engine issues.
What Tools Are Needed For Belt Tension Check?
Use a tension gauge or a simple ruler to measure the belt deflection.
Conclusion
Regularly checking your alternator belt tension ensures a well-functioning vehicle. Proper tension prevents unexpected breakdowns and costly repairs. Follow the steps outlined in this guide for easy maintenance. Keep your car running smoothly and extend its lifespan by giving attention to the alternator belt.
Your vehicle will thank you.