
Replacing a wheel hub assembly involves removing the old hub and installing a new one. This ensures smooth wheel rotation and safety.
A wheel hub assembly is a crucial component of your vehicle’s suspension system. It connects the wheel to the car, allowing for proper rotation and movement. Faulty wheel hubs can lead to vibrations, noise, and even steering issues. Replacing a worn-out wheel hub assembly restores optimal performance and safety.
This task typically requires mechanical knowledge and specialized tools. Regular maintenance and timely replacement of the wheel hub assembly can prevent costly repairs and ensure a smooth driving experience. Always consult a professional mechanic if you are unsure about performing this replacement yourself.
Introduction To Wheel Hub Assembly
The wheel hub assembly is a crucial part of your vehicle. It connects the wheels to the car. This component helps your wheels turn smoothly. Understanding its role helps you maintain your vehicle better.
The Role Of The Wheel Hub In Your Vehicle
The wheel hub assembly has several important functions:
- It connects the wheel to the axle.
- It houses the wheel bearings.
- It ensures smooth wheel rotation.
- It helps with the vehicle’s stability.
The wheel hub assembly also impacts your car’s braking system. A good hub assembly ensures your car stops safely. It is essential for your vehicle’s overall performance.
Signs It’s Time For A Replacement
Several signs indicate your wheel hub assembly needs replacement:
- Strange Noises: Clicking or grinding sounds from the wheels.
- Vibration: The steering wheel shakes while driving.
- ABS Light: The ABS warning light turns on.
- Uneven Tire Wear: Tires wear out faster on one side.
If you notice these signs, consider checking your wheel hub assembly. Acting quickly can prevent further damage. Your car will be safer and more reliable.
Tools And Materials Needed
Replacing a wheel hub assembly can seem daunting. With the right tools and materials, the job becomes manageable. Here, we cover all you need.
Essential Tools For The Job
Having the right tools is crucial. These tools ensure efficiency and safety.
- Socket Set: A complete set is essential.
- Torque Wrench: For precise tightening.
- Jack and Jack Stands: To safely lift and hold the vehicle.
- Breaker Bar: To loosen stubborn bolts.
- Hammer: Useful for tapping parts into place.
- Needle Nose Pliers: For handling small parts.
Materials And Replacement Parts
You also need specific materials and parts. These ensure the job is done right.
| Material/Part | Description |
|---|---|
| New Wheel Hub Assembly | The main replacement part. |
| Anti-Seize Compound | Prevents parts from sticking. |
| Thread Locker | Secures bolts and nuts. |
| Grease | Lubricates moving parts. |
| Gloves | Protects your hands. |
Preparing Your Vehicle
Before replacing a wheel hub assembly, preparation is key. Ensuring your vehicle is ready for the task guarantees a smooth process. Follow these steps to prepare your vehicle properly.
Safety First: Securing Your Car
Your safety is the top priority. Securing your car is essential to avoid accidents. Follow these steps:
- Park on a flat, level surface.
- Engage the parking brake.
- Place wheel chocks behind the wheels.
- Wear safety gloves and glasses.
Removing The Wheel
Once your car is secured, you can start removing the wheel. Here’s how:
- Use a lug wrench to loosen the lug nuts.
- Jack up the car with a car jack.
- Place a jack stand under the car for safety.
- Fully remove the lug nuts.
- Carefully take off the wheel.
| Step | Description |
|---|---|
| 1 | Loosen the lug nuts with a lug wrench. |
| 2 | Jack up the car with a car jack. |
| 3 | Place a jack stand under the car. |
| 4 | Remove the lug nuts completely. |
| 5 | Take off the wheel carefully. |

Credit: www.amazon.com
Accessing The Wheel Hub Assembly
Accessing the wheel hub assembly is crucial. It involves several key steps. Each step ensures proper removal and installation. Safety is the top priority during this process.
Taking Off The Brake Caliper
The first step is taking off the brake caliper. Follow these steps:
- Use a wrench to remove the caliper bolts.
- Gently slide the caliper off the rotor.
- Hang the caliper using a wire or bungee cord. Do not let it dangle.
Make sure the brake lines are not stressed. This prevents damage.
Removing The Rotor
Next, focus on removing the rotor. Follow these steps:
- Remove any retaining screws or clips from the rotor.
- Gently tap the rotor with a rubber mallet. This loosens it.
- Slide the rotor off the wheel studs.
If the rotor is stuck, use penetrating oil. Allow it to sit for a few minutes. Then, try removing the rotor again.
| Step | Tool Needed | Action |
|---|---|---|
| 1 | Wrench | Remove caliper bolts |
| 2 | Rubber Mallet | Tap the rotor |
| 3 | Wire/Bungee Cord | Hang the caliper |
Removing The Old Wheel Hub Assembly
Removing the old wheel hub assembly is a crucial step in vehicle maintenance. It’s essential for ensuring your vehicle runs smoothly. Follow these steps to safely and efficiently remove the old assembly.
Detaching The Hub Assembly
Start by loosening the lug nuts on the wheel. Use a wrench for this task. Once the lug nuts are loose, lift the vehicle using a jack. Secure it with jack stands for safety.
Next, remove the wheel to access the hub assembly. Locate the brake caliper and remove the bolts holding it. Carefully set the caliper aside without stressing the brake line.
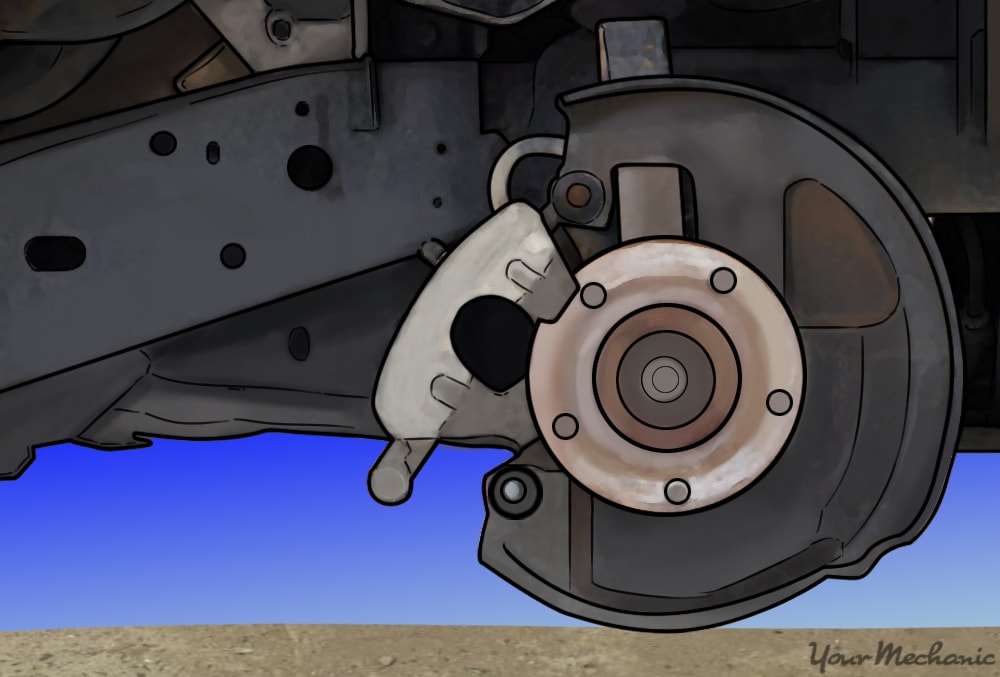
Now, detach the rotor by sliding it off the wheel hub. If it’s stuck, a gentle tap with a mallet should help. With the rotor removed, you can see the hub assembly clearly.
Remove the bolts holding the hub assembly to the steering knuckle. Pull the hub assembly out carefully. If it’s rusted, use a rust penetrant to ease the process.
Troubleshooting Common Issues
Sometimes, the hub assembly can be stubborn. Rust is a common issue. Spray a rust penetrant and let it sit for a few minutes.
If the assembly is still stuck, use a rubber mallet. Gently tap around the hub to loosen it. Be patient and avoid using excessive force.
Another issue might be corroded bolts. Use a breaker bar for extra leverage. Apply a rust penetrant if needed.
If the bolts are stripped, consider using a bolt extractor. It will help remove damaged bolts without causing further issues.
Here is a quick troubleshooting table:
| Issue | Solution |
|---|---|
| Rust | Use rust penetrant and a rubber mallet. |
| Stuck Hub Assembly | Tap gently with a rubber mallet. |
| Corroded Bolts | Apply rust penetrant, use a breaker bar. |
| Stripped Bolts | Use a bolt extractor tool. |
Credit: www.yourmechanic.com
Selecting The Right Replacement Hub
Choosing the correct wheel hub assembly is crucial for vehicle safety. Your car’s performance depends on it. This guide will help you make the right choice.
Oem Vs Aftermarket Hubs
OEM hubs are made by the original vehicle manufacturer. They fit perfectly and ensure the same quality as the original part. Aftermarket hubs are produced by third-party companies. They can be cheaper but may vary in quality and fit.
OEM hubs provide guaranteed compatibility. You get the same performance as the original. Aftermarket hubs offer more variety and can be more affordable. But you must research the brand and read reviews.
| Type | Pros | Cons |
|---|---|---|
| OEM | Perfect fit, high quality | Higher cost |
| Aftermarket | Lower cost, more options | Varied quality, possible fit issues |
Ensuring The Correct Fit
The correct fit is essential for safety and performance. Measure the old hub assembly before purchasing a new one. Check the bolt pattern, bearing size, and ABS compatibility.
Review the vehicle’s manual to verify the specifications. This ensures that the new hub assembly matches your vehicle. Buying the wrong size can lead to serious problems.
- Measure the old hub assembly
- Check bolt pattern
- Verify bearing size
- Ensure ABS compatibility
Always double-check the product details before making a purchase. This prevents any fitment issues.
Installing The New Wheel Hub Assembly
Replacing a wheel hub assembly may seem daunting, but with the right tools and a step-by-step guide, it’s manageable. This section will walk you through the process, ensuring you install the new wheel hub assembly correctly.
Step-by-step Installation Guide
- Prepare Your Tools: Ensure you have all the necessary tools ready, including a jack, lug wrench, socket set, and torque wrench.
- Lift the Vehicle: Use a jack to lift the vehicle and secure it with jack stands.
- Remove the Wheel: Use a lug wrench to remove the wheel nuts and take off the wheel.
- Detach the Brake Caliper: Remove the bolts holding the brake caliper and secure it aside without stretching the brake line.
- Take Off the Brake Rotor: Slide the rotor off the wheel hub assembly.
- Unbolt the Old Hub: Remove the bolts that secure the old wheel hub assembly to the steering knuckle.
- Install the New Hub: Align the new hub assembly with the steering knuckle and bolt it in place.
- Reattach the Brake Rotor: Slide the brake rotor back onto the new wheel hub assembly.
- Secure the Brake Caliper: Reattach the brake caliper and tighten the bolts.
- Mount the Wheel: Place the wheel back on the hub and tighten the lug nuts.
- Lower the Vehicle: Carefully lower the vehicle from the jack stands and fully tighten the lug nuts.
Torque Specifications And Alignment
| Component | Torque Specification (ft-lbs) |
|---|---|
| Wheel Hub Assembly Bolts | 75-85 |
| Brake Caliper Bolts | 25-35 |
| Lug Nuts | 80-100 |
Ensuring the correct torque specifications is critical for safety. Always use a torque wrench to tighten bolts to the specified values.
Check the wheel alignment after installation. Misalignment can cause uneven tire wear and poor handling.
Follow these steps and guidelines to replace your wheel hub assembly safely and effectively.
Reassembling The Brake Components
After replacing the wheel hub assembly, the next step is to reassemble the brake components. This process is crucial for ensuring your vehicle’s braking system functions properly. Follow these steps to ensure a safe and efficient reassembly.
Reattaching The Rotor
The first step is to reattach the rotor. Carefully slide the rotor onto the wheel hub. Make sure it fits snugly and aligns perfectly. It is important that the rotor sits flush against the hub to avoid any wobbling or vibrations.
| Step | Action |
|---|---|
| 1 | Align the rotor with the wheel hub. |
| 2 | Slide the rotor onto the hub carefully. |
| 3 | Ensure the rotor sits flush against the hub. |
Mounting The Brake Caliper
Next, mount the brake caliper. Align the caliper with the rotor and bracket. Insert the caliper bolts and tighten them securely. This ensures the caliper remains stable during braking.
- Align the brake caliper with the rotor.
- Insert the caliper bolts.
- Tighten the bolts securely.
Check that the brake pads are correctly positioned. This will ensure even contact with the rotor. Once the brake caliper is mounted, double-check all bolts and components.
- Ensure brake pads are correctly positioned.
- Double-check all bolts for tightness.
- Verify alignment of all components.
Completing these steps will ensure your brake components are correctly reassembled. This will provide reliable braking performance.
Final Steps And Wheel Installation
You’ve replaced your wheel hub assembly. Now, it’s time for the final steps. Installing the wheel correctly ensures safety and performance. Follow these simple steps to finish your job perfectly.
Double-checking Your Work
Before putting the wheel back on, double-check your work. Ensure all components are tight and secure.
- Make sure the hub assembly is properly aligned.
- Tighten all bolts to the manufacturer’s specifications.
- Check for any loose parts or missed steps.
Double-checking prevents potential issues. It ensures safety for your vehicle.
Putting The Wheel Back On
Now, it’s time to put the wheel back on. Follow these steps:
- Align the wheel with the hub assembly.
- Place the wheel onto the hub carefully.
- Insert the lug nuts by hand to avoid cross-threading.
- Use a lug wrench to tighten the nuts in a star pattern.
- Lower the vehicle slowly using the jack.
- Once the vehicle is on the ground, fully tighten the lug nuts.
Using a star pattern ensures even pressure on the wheel. It prevents potential damage and ensures a secure fit.
Finally, take a moment to inspect your work. Make sure everything is secure. Your wheel hub assembly replacement is now complete!

Credit: www.amazon.com
Test Driving And Troubleshooting
After replacing the wheel hub assembly, it is crucial to test drive the vehicle. This step helps to ensure that the new assembly functions correctly. During the test drive, listen for unusual sounds and feel for any irregularities. This will help identify any problems that need fixing.
What To Listen For
When you test drive, pay attention to the following sounds:
- Grinding noises: These may indicate that the bearings are not aligned.
- Clicking sounds: This could mean loose or improperly installed parts.
- Humming or whining: This might suggest that the new assembly is faulty.
Adjustments And Fixes
If you hear any of these sounds, you may need to make adjustments. Here is a quick guide:
| Issue | Possible Cause | Solution |
|---|---|---|
| Grinding noise | Misaligned bearings | Recheck alignment and adjust bearings |
| Clicking sound | Loose parts | Tighten all bolts and nuts |
| Humming or whining | Faulty assembly | Inspect and replace if needed |
If you need to make any adjustments:
- Park the vehicle on a flat surface.
- Use a jack to lift the vehicle safely.
- Remove the wheel to access the hub assembly.
- Check the torque on all bolts and nuts.
- Realign the bearings if needed.
- Reassemble and test drive again.
These steps should help ensure your wheel hub assembly functions properly. Always listen and feel for irregularities during your test drive.
Maintenance Tips For Wheel Hub Assemblies
Regular maintenance of wheel hub assemblies is crucial. It ensures smooth driving and prolongs the life of your vehicle. Here are some essential tips to keep your wheel hub assemblies in top shape.
Routine Checks And Balancing
Conduct routine checks on your wheel hub assemblies. Inspect for any signs of wear or damage. Look for loose bolts, unusual noises, or vibrations.
- Check for any rust or corrosion.
- Ensure all bolts are tight.
- Listen for grinding or humming sounds.
Balancing your wheels helps in maintaining the wheel hub assembly. It prevents uneven tire wear and enhances driving comfort. Here are steps to balance your wheels:
- Remove the wheel from the vehicle.
- Mount it on a balancing machine.
- Adjust weights to achieve balance.
Preventing Future Issues
Preventing future issues involves proactive measures. Use high-quality parts for replacements. Cheap parts can lead to frequent problems.
Keep your vehicle’s weight within recommended limits. Overloading can strain the wheel hub assemblies. Follow these tips to prevent future issues:
- Use OEM parts for replacements.
- Avoid overloading your vehicle.
- Regularly lubricate moving parts.
Maintenance is key for the longevity of wheel hub assemblies. Follow these tips to ensure a smooth and safe ride.
Frequently Asked Questions
What Is A Wheel Hub Assembly?
A wheel hub assembly connects the wheel to the vehicle’s suspension and enables smooth rotation.
How To Know If It Needs Replacement?
Signs include noise, vibration, or uneven tire wear. A mechanic can diagnose the issue.
Can I Replace It Myself?
Yes, with proper tools and knowledge. Otherwise, seek professional help for safety.
How Long Does Replacement Take?
Typically, it takes 1-2 hours. Time varies based on vehicle type and mechanic expertise.
What Happens If Not Replaced?
Ignoring it can cause wheel detachment, leading to unsafe driving conditions and further damage.
Conclusion
Replacing your wheel hub assembly ensures safe and smooth driving. Regular maintenance can prevent costly repairs. By following proper guidelines, you can extend your vehicle’s lifespan. Don’t ignore warning signs; address them promptly. Trust professionals for complex tasks. Keep your vehicle in top shape for a safe and enjoyable ride.


